Table of Contents
ToggleCedar deck railings deliver beauty, strength, and longevity, three things every homeowner wants when they’re investing in outdoor living. Whether you’re building a new deck or replacing worn-out balusters, cedar offers natural rot resistance, beautiful grain patterns, and the kind of warmth that pressure-treated lumber just can’t match. This guide walks through classic, modern, and creative cedar railing designs, plus the practical details you need to install and maintain them. No fluff, just real options that work.
Key Takeaways
- Cedar deck railing ideas range from classic vertical balusters to modern horizontal slats and cable systems, all leveraging cedar’s natural rot resistance and aesthetic warmth without chemical treatment.
- Proper installation requires posts spaced no more than 6 feet apart and through-bolted to deck framing, with 4-inch baluster spacing on center to meet child-safety codes per IRC requirements.
- Cedar railings demand minimal maintenance when properly sealed with penetrating oil or semi-transparent stain every 2–3 years, plus annual inspections and cleaning with mild detergent to prevent rot and loose fasteners.
- Mixing cedar with stainless steel cables, glass panels, or aluminum balusters creates contemporary cedar railing designs that balance durability with modern aesthetics at varying budget levels.
- Use stainless steel or coated screws and pre-drill all holes near end grain to prevent splitting and discoloration, ensuring a professional finish and long-term structural integrity.
Why Choose Cedar for Your Deck Railing
Western Red Cedar and Eastern White Cedar are the two species most commonly used for deck railings, and both bring natural advantages that synthetic materials can’t replicate. Cedar contains natural oils, primarily thujaplicins, that resist rot, decay, and insect damage without chemical treatment. This makes it ideal for exterior applications where moisture and UV exposure are constant.
Cedar is lightweight compared to tropical hardwoods, which makes it easier to cut, drill, and fasten. A standard 2×2 baluster weighs about half what a similar piece of pressure-treated pine does, reducing strain on both the builder and the deck frame. It also holds screws and nails well without splitting, provided you pre-drill near the ends.
From an aesthetic standpoint, cedar weathers to a silver-gray patina if left untreated, or it can be stained or sealed to preserve its warm honey or reddish tones. Unlike treated lumber, cedar doesn’t leach chemicals, making it a safer choice for homes with kids and pets. Expect to pay $3–$6 per linear foot for clear-grade cedar balusters, depending on your region and the grade (Clear, Select, or Knotty). Knotty grades cost less but may not meet code if knot size compromises structural integrity, check your local IRC requirements for baluster spacing and strength.
Classic Cedar Railing Styles That Never Go Out of Fashion
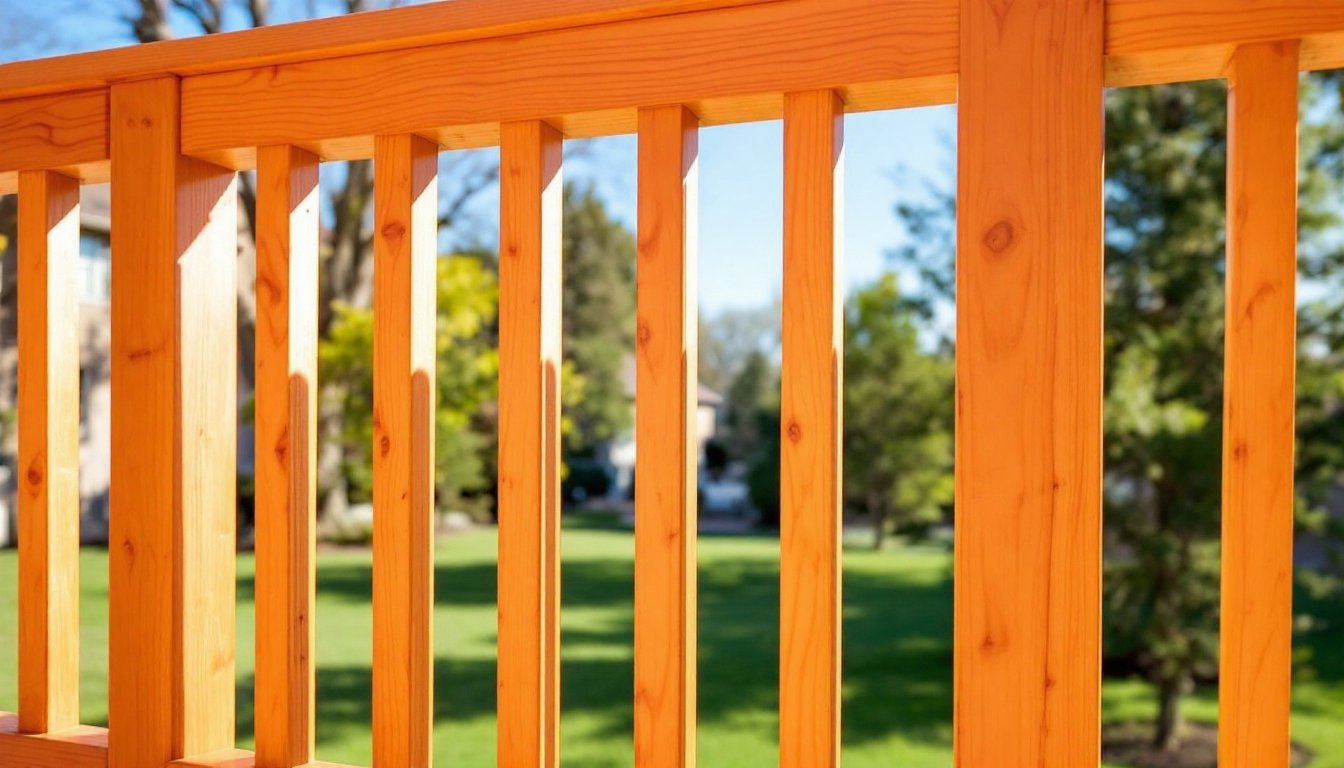
Vertical baluster railings remain the most common design for good reason: they meet code, provide clear sightlines, and never look dated. Standard baluster spacing is 4 inches on center (measured from the center of one baluster to the next) to prevent a 4-inch sphere from passing through, this is the IRC’s child-safety requirement. Use 2×2 cedar balusters between a 2×4 top rail and 2×4 bottom rail for a clean, proportional look.
Horizontal cable rails with cedar posts blend traditional and modern. Cedar 4×4 or 6×6 posts anchor stainless steel cable runs spaced 3 inches apart vertically. The cables provide an unobstructed view while the cedar posts add warmth and visual weight. This style works especially well on hillside decks or properties with scenic views. Make sure cable tension is properly maintained, loose cables sag and fail inspection.
Cedar lattice panels offer a semi-private option for decks that face neighbors or busy streets. Frame ¾-inch cedar lattice with 1×4 cedar trim and mount between posts. Lattice won’t meet code as a standalone railing (it’s not strong enough), so pair it with a structural top rail and mount it as an infill panel. This approach is popular on covered porches and lower-level decks.
Chamfered or routed balusters add a craftsman touch without requiring advanced skills. Run a 45-degree chamfer bit or roundover bit along the edges of 2×2 balusters before installation. It’s a small detail that breaks up the blocky look of square-cut lumber and catches light differently throughout the day.
Modern and Contemporary Cedar Railing Designs
Thick horizontal cedar slats create a sleek, architectural look that works well on modern homes. Use 1×4 or 1×6 cedar boards spaced 1–2 inches apart, running horizontally between posts. This design requires blocking or a hidden rail system behind the slats to meet structural codes, horizontal members must be able to withstand a 200-pound concentrated load at mid-span per IRC guidelines. Fasten from behind with stainless steel screws to avoid visible fastener heads.
Vertical cedar slats with varied spacing add rhythm and visual interest. Alternate 2×2 balusters with wider gaps (up to 4 inches) or double up balusters in clusters with narrow gaps between. As long as the largest opening doesn’t exceed 4 inches, it’s code-compliant. This technique creates a “picket fence” effect that feels less rigid than evenly spaced balusters.
Top-mount glass panels with cedar framing deliver an ultra-modern aesthetic. Use ¾-inch tempered glass in aluminum or stainless channels, framed by 4×4 cedar posts and a 2×6 cedar cap rail. The glass must be tempered and meet ASTM safety standards. This is a higher-cost option, budget $150–$250 per linear foot installed, but it maximizes views and pairs beautifully with contemporary architecture. Cedar posts soften the industrial feel of the metal and glass.
Minimalist cedar posts with wire infill use stainless steel wire rope (typically 1/8-inch diameter) tensioned horizontally between posts. Drill through 4×4 cedar posts, thread the wire, and tension with turnbuckles. Space wires 3 inches apart. It’s lightweight, nearly invisible from a distance, and requires less maintenance than wood balusters. Use marine-grade stainless (316) in coastal areas to prevent corrosion.
Creative Cedar Railing Ideas for Unique Outdoor Spaces
Angled or chevron baluster patterns break away from strict vertical lines. Arrange 2×2 cedar balusters in alternating angles, say, 45 degrees left, then 45 degrees right, to create a dynamic zigzag effect. This requires more cutting and planning (a miter saw is essential here), but the result is eye-catching and custom. Make sure the diagonal balusters still meet the 4-inch sphere rule at their widest point.
Cedar branch or twig railings bring a rustic, organic feel to cabin-style decks. Source straight cedar branches (2–3 inches in diameter), strip the bark, sand smooth, and install them as balusters or decorative infill. This style is labor-intensive and won’t pass code in most jurisdictions as a primary railing, but it works beautifully as an accent panel or interior porch rail. Seal with a clear exterior finish to prevent checking and insect intrusion.
Mixed-height posts with decorative caps add architectural detail. Vary post heights, some at the standard 36–42 inches, others extending to 48–60 inches, and top each with a turned cedar finial, pyramid cap, or copper post cap. This creates visual landmarks along the deck perimeter and pairs well with detailed woodworking plans that include custom millwork.
Mixing Materials: Cedar Combined with Metal and Glass
Cedar’s warmth plays well with industrial materials. Powder-coated aluminum balusters between cedar posts create contrast while reducing maintenance, aluminum won’t rot, split, or need refinishing. Use black or bronze finishes to complement cedar’s natural tones.
Cedar posts with steel cable or rod infill blend the best of both worlds: the cedar provides visual weight and a mounting surface, while the metal offers strength and transparency. Many furniture building tutorials use similar hybrid techniques for indoor projects, and the same joinery principles apply outdoors.
Frosted or tinted glass panels in cedar frames add privacy without blocking light. Quarter-inch tempered glass in bronze or gray tint works well in urban settings where neighbors are close. Frame the glass with rabbeted 2×4 cedar rails and seal the joints with silicone to prevent water intrusion. This design pairs nicely with step-by-step project guides that walk through intermediate joinery techniques.
Installing and Maintaining Your Cedar Deck Railing
Start with proper post placement. Deck railing posts should be spaced no more than 6 feet apart and must be through-bolted to the deck framing, not just screwed to the rim joist. Use two ½-inch galvanized or stainless carriage bolts per post, drilled through the post and the deck’s band joist or blocking. Posts mounted to the decking surface alone won’t meet code and can fail under lateral load.
Cut all cedar components to length using a miter saw or circular saw with a fine-tooth blade (60+ teeth) to minimize tear-out. Pre-drill all screw holes within 2 inches of the end grain to prevent splitting. Use stainless steel or coated deck screws, standard galvanized screws can react with cedar’s tannins and cause black staining.
Assemble the top and bottom rails first, then install balusters one at a time, checking spacing with a homemade jig (a scrap block cut to 4 inches works perfectly). Fasten balusters with two screws at each end, one screw can allow the baluster to pivot over time. If local code requires a mid-rail (common when balusters exceed 36 inches in height), install it before adding balusters.
Safety note: Wear safety glasses and hearing protection when cutting and drilling. Cedar dust can irritate eyes and lungs, so use a dust mask or respirator during extended milling.
Cedar requires minimal maintenance, but it’s not maintenance-free. Apply a penetrating oil or semi-transparent stain within the first few months to lock in color and enhance UV protection. Expect to reapply every 2–3 years depending on sun exposure. If you prefer the weathered gray look, skip the finish, but inspect annually for loose fasteners, checking, and signs of rot at post bases where water can collect.
Clean cedar railings yearly with a mild detergent and soft brush. Avoid pressure washing at close range (it can splinter the wood) and never use bleach-based cleaners, which can damage the wood fibers and accelerate weathering. Check all fasteners and tighten as needed, wood shrinks and swells with seasonal moisture changes, which can loosen connections over time.
Conclusion
Cedar deck railings offer a rare combination of beauty, durability, and workability that few materials can match. Whether you go classic vertical, modern horizontal, or something entirely custom, cedar adapts to your vision while meeting the structural demands of a code-compliant railing system. Plan carefully, build with quality fasteners, and maintain the finish, your cedar railing will reward you with decades of solid performance.