Table of Contents
ToggleA range hood isn’t just a functional necessity, it’s a design opportunity. Whether the goal is to hide the hood completely or make it the focal point of the kitchen, the cabinet integration matters just as much as CFM ratings and duct placement. In 2026, homeowners are moving away from generic stainless steel boxes and embracing custom-built surrounds, concealed inserts, and statement pieces that tie the kitchen together. This guide covers over fifteen cabinet range hood ideas, from budget-friendly DIY builds to high-end custom installations, with practical details on materials, construction, and code considerations.
Key Takeaways
- Cabinet range hood ideas blend function with design, transforming the cooktop area into a focal point while removing grease, smoke, and odors through proper ventilation and code-compliant ductwork.
- Wood hoods require heat-resistant finishes and proper 24–30 inch clearance from burners, while custom insert liners from brands like Zephyr and Broan cost $300–$800 and offer dishwasher-safe filters for easy maintenance.
- Concealed and downdraft hood options work best for contemporary kitchens where a seamless cabinet line is desired, though they deliver lower CFM (300–600) compared to traditional overhead hoods (600–1,200 CFM).
- Statement-making designs like exposed brick, copper, or shiplap hoods serve as dramatic kitchen focal points, with hood width ideally sized at 1.1 to 1.3 times the cooktop width for proper visual balance.
- DIY cabinet range hood projects can be completed for $200–$600 in materials plus insert costs using basic carpentry skills and standard tools like a miter saw and stud finder.
- Building permits are typically required when adding a new hood or altering duct routing, so checking local building codes and ventilation standards (100 CFM minimum, or 1 CFM per 100 BTU for gas) before construction is essential.
Why Cabinet Range Hoods Are Essential for Modern Kitchens
A properly vented range hood removes grease, smoke, and cooking odors before they settle on surfaces or trigger smoke detectors. But beyond air quality, the hood cabinet defines the visual weight above the cooktop.
Code compliance is the first consideration. Most jurisdictions require range hood ventilation when installing gas cooktops, and many now mandate it for high-BTU electric ranges. The International Residential Code (IRC) specifies minimum airflow of 100 CFM for intermittent use, though professionals often recommend 1 CFM per 100 BTU for gas ranges. Local amendments vary, so checking with the building department before framing a custom hood enclosure is non-negotiable.
From a design standpoint, cabinet range hoods create vertical interest in kitchens with standard 8-foot ceilings. A well-proportioned hood surround draws the eye upward, balancing lower cabinetry and creating a natural focal point. The cabinet can house the blower and ductwork while providing additional display or storage space on flanking shelves.
Material choice affects both durability and aesthetics. Wood hoods need heat-resistant finishes and proper clearance from burners, typically 24 inches minimum for electric, 30 inches for gas, per manufacturer specs and local code. Metal hoods require fewer fire-rated considerations but may show grease buildup more readily without regular degreasing.
Built-In Cabinet Range Hood Designs
Custom Wood Cabinet Range Hoods
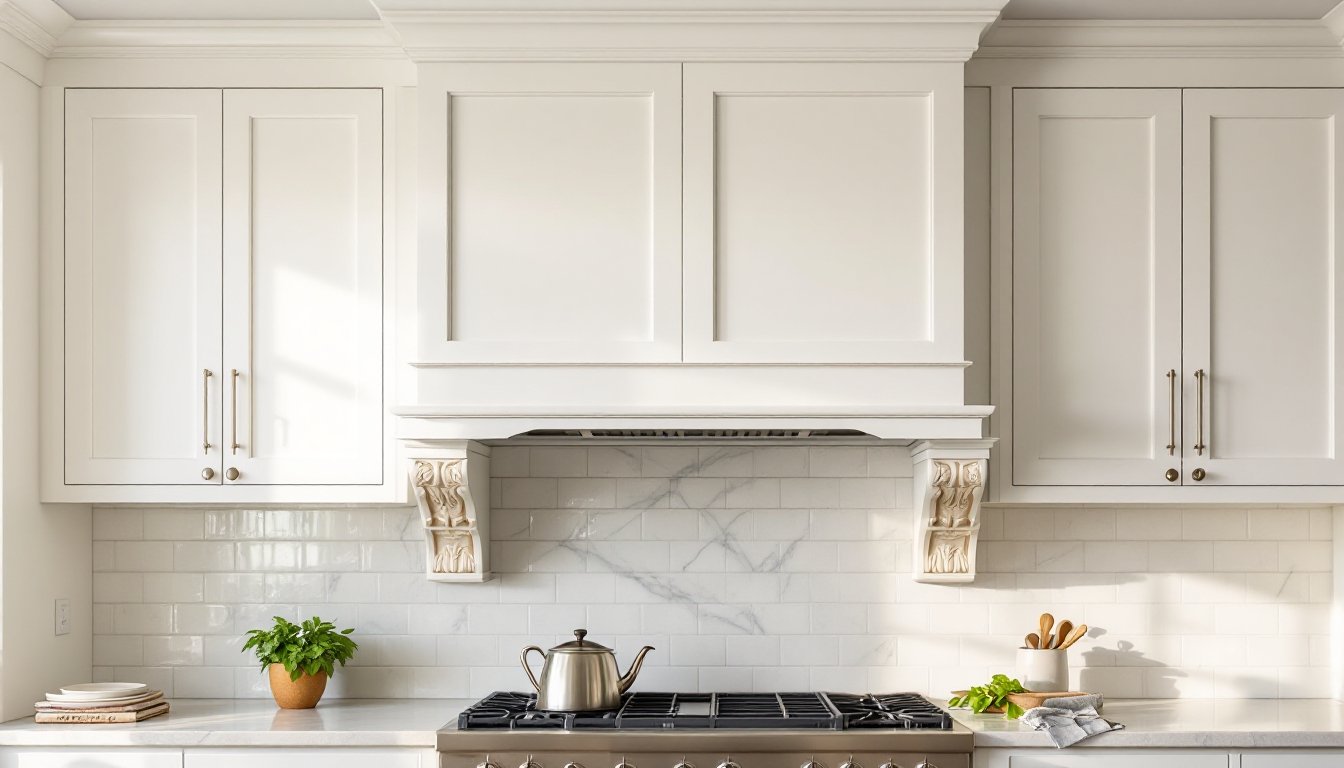
Custom wood hoods blend seamlessly with cabinetry, especially when built from matching door panels and crown molding. The structure typically consists of a plywood box that houses an insert liner, the actual blower and capture area, while the exterior finish matches surrounding cabinets.
Construction starts with a frame built from 2×4 or 2×6 framing lumber anchored to wall studs and ceiling joists. The hood depth should extend 3 inches beyond the front burners for proper capture. Width generally matches the cooktop width plus 6 to 12 inches, depending on ceiling height and proportion.
Sheathe the frame with ½-inch or ¾-inch plywood, then apply matching veneer or cabinet-grade panels. Many builders use the same door style as lower cabinets, mounting false drawer fronts or decorative panels on the hood face. Crown molding at the ceiling junction and a substantial bottom trim piece (sometimes corbels or brackets) complete the integration.
Finish considerations: Standard cabinet paint or stain works, but add a coat of polyurethane or conversion varnish rated for kitchen use. Heat and grease will degrade untreated wood finishes within months. Reclaimed wood planks work well for rustic or farmhouse styles but require sealing on all sides.
The insert liner (the metal guts) typically costs $300–$800 for a quality unit with adequate CFM. Brands like Zephyr, Broan, and Best offer inserts designed specifically for custom enclosures, with front-accessible controls and dishwasher-safe baffle filters.
Sleek Hidden and Concealed Range Hood Options
Concealed hoods disappear entirely into cabinetry, leaving only a slim grille or panel visible. These suit contemporary or minimalist kitchens where breaking the cabinet line would disrupt the design.
Downdraft hoods rise from the countertop or cooktop surface when needed and retract flush when not in use. They work best with island cooktops where overhead venting is impractical. Ventilation performance lags behind traditional hoods, most downdrafts provide 300–600 CFM compared to 600–1,200 CFM for overhead units, so they’re better suited to light cooking or electric cooktops.
Cabinet-front hoods hide behind a cabinet door that opens automatically when the blower activates. The door face matches surrounding cabinetry, and ideas for integrating range hoods seamlessly into cabinetry show how invisible these installations can be. Installation requires precise hinge placement and often a motorized lift mechanism, adding $500–$1,000 to the project cost.
Under-cabinet inserts mount inside a standard wall cabinet with a front grille. The cabinet appears unbroken from the outside. This approach works with existing cabinets but requires verifying interior dimensions match the insert specs. Most inserts need 12–18 inches of interior depth and clearance for ductwork exiting through the cabinet back or top.
Statement-Making Range Hood Styles
Some kitchens call for a hood that commands attention rather than blending in. These bold designs make the range hood the room’s centerpiece.
Exposed brick or stone hoods suit industrial, Mediterranean, or modern farmhouse styles. Building one involves either real thin brick or stone veneer applied over a plywood base. The structure must support significant weight, stone veneer adds 10–15 pounds per square foot. Reinforce the frame with doubled 2×6 headers and verify ceiling joist capacity. Use Type S mortar for attaching veneer and seal with a breathable masonry sealer after installation.
Decorative metal hoods in copper, brass, or hammered stainless make striking focal points. Custom fabrication runs $2,000–$6,000, but the look works particularly well with traditional or transitional kitchens. Copper develops a patina over time unless sealed: brass requires regular polishing. Stainless with a brushed or hammered finish hides fingerprints better than mirror-polished surfaces.
Shiplap or board-and-batten hoods bring texture without the weight of masonry. Use 1×6 or 1×8 pine boards (actual dimensions ¾ x 5½ or ¾ x 7¼) over the plywood substrate. Prime all sides before installation, unprimed backsides will absorb moisture and warp. Popular design trends from resources like thekitchn.com highlight how horizontal shiplap on a hood contrasts nicely with vertical cabinet doors.
Arched or curved hoods require more advanced carpentry. Creating a smooth curve involves either bending thin plywood (⅛-inch luan works) over curved ribs or stacking graduated plywood cutouts and fairing with joint compound. Either method is time-intensive but creates dramatic European or Old World aesthetics.
For all statement hoods, balance is critical. A massive hood over a small 30-inch range looks disproportionate: conversely, a delicate hood over a 48-inch pro-style range gets visually lost. As a rule of thumb, hood width should be 1.1 to 1.3 times the cooktop width, and the hood face depth should relate to the overall kitchen scale.
Budget-Friendly DIY Cabinet Range Hood Projects
Building a custom hood cabinet doesn’t require a contractor’s budget. With basic carpentry skills and a weekend, a DIYer can create a functional hood surround for $200–$600 in materials plus the cost of the insert liner.
Materials list for a basic wood hood:
- Two 8-foot 2x4s for framing ($8–$12)
- One 4×8 sheet ¾-inch plywood ($50–$70)
- Crown molding and trim to match cabinets (20–30 linear feet, $40–$100)
- Wood glue and 2½-inch exterior screws ($15)
- Primer and paint or stain ($30–$50)
- Range hood insert liner ($300–$800)
Tool requirements: Circular saw or miter saw, drill/driver, stud finder, level, tape measure, orbital sander. A pneumatic brad nailer speeds trim installation but isn’t essential, a hammer and finish nails work fine.
Step-by-step process:
- Locate studs in the wall behind the range. Mark stud centers and plan the hood width to hit at least two studs.
- Build the frame from 2x4s, creating a rectangular box open at the bottom. Dimensions depend on cooktop size: for a 30-inch range, a 36-inch-wide by 20-inch-deep hood works well.
- Anchor to wall and ceiling. Screw the frame into studs with 3-inch lag screws and attach a ceiling cleat into joists. This hood will weigh 80+ pounds when finished.
- Sheathe with plywood. Cut panels for the front, sides, and bottom (with a centered opening for the insert). Attach with glue and 1¼-inch brad nails or screws.
- Install the insert liner according to manufacturer instructions. Most slide in from below and secure with mounting brackets. Run ductwork to an exterior vent, avoid terminating in the attic.
- Add trim and molding. Miter corners on crown molding and attach with a brad nailer. Fill nail holes with wood filler.
- Prime, sand, and paint. Two coats of semi-gloss paint provide durability. For stain, use gel stain for easier color matching to existing cabinets.
Salvage and budget hacks: Reclaimed wood from pallets or barn siding makes great hood cladding and costs little or nothing. Architectural salvage yards sometimes stock corbels and brackets for $20–$50 per pair. An under-cabinet hood converted to an insert (remove the decorative cover) can save $200 versus buying a purpose-built insert.
When to call a pro: If ductwork needs to run more than 10 feet or requires multiple elbows, consider hiring an HVAC contractor. Poor duct design kills airflow. Also, current trends in remodel inspiration often feature complex joinery or metalwork that’s worth farming out unless the builder has welding or advanced woodworking skills.
Permit considerations: Most jurisdictions don’t require permits for replacing a range hood with a similar unit, but adding a new hood where none existed, changing duct routing, or doing electrical work often does. A quick call to the local building department clarifies requirements and avoids issues during home sales.
Conclusion
Cabinet range hoods offer one of the highest visual impacts per dollar in a kitchen update. Whether building a showpiece from reclaimed wood, installing a sleek concealed unit, or simply boxing in an insert with matching cabinet panels, the project combines function with design. The key is planning ductwork and support structure first, then designing the aesthetics around those requirements. With proper framing, adequate CFM for the cooktop, and attention to finish durability, a custom hood becomes a long-term centerpiece that handles daily cooking while elevating the entire kitchen.