Table of Contents
ToggleAdding a deck to a camper isn’t just about extra square footage, it’s about creating usable outdoor living space that extends the functionality of the rig. Whether parked at a seasonal site or boondocking in the backcountry, a well-built deck provides a clean transition zone between inside and out, keeps dirt and debris from tracking indoors, and offers a stable platform for seating, cooking, or storage. The approach varies widely depending on how often the camper moves, the type of terrain it sits on, and whether the setup is seasonal or permanent. This guide covers practical deck designs, from lightweight portable frames to semi-permanent structures, with attention to materials, construction methods, and code considerations.
Key Takeaways
- A camper deck creates usable outdoor living space that levels uneven terrain, prevents mud tracking indoors, and extends functionality without requiring a larger RV.
- Portable decks built in 4×8 or 4×10-foot panels are ideal for campers that move frequently, costing $300–$600 in materials and allowing easy disassembly for transport.
- Most freestanding camper deck designs don’t require permits if under 200 square feet and 30 inches high, but always verify local building codes and lease requirements before construction.
- Built-in decks for permanent sites must sit on frost-line footings and include proper railings (if over 30 inches high), uniform steps, and reinforced bracing to meet safety codes.
- Multi-level and expandable deck ideas maximize space on sloped sites or seasonal setups using hinged sections, wraparound layouts, and independent frame connections.
- Furnish your camper deck with weather-resistant elements like polypropylene rugs, lightweight furniture, solar lighting, and shade solutions to create a comfortable year-round outdoor zone.
Why Add a Deck to Your Camper?
A camper deck solves several practical problems at once. First, it levels out uneven ground, which is especially useful on sloped or soft terrain where the camper itself may sit slightly askew. Second, it provides a mud-free zone at the entry door, reducing wear on interior flooring and cutting down on cleaning time. Third, it expands living space without requiring a larger or more expensive RV.
Decks also improve safety. Steps built into the deck frame are more stable than freestanding portable stairs, and handrails can be added to meet local safety codes if the deck height exceeds 30 inches. For families with kids or pets, a gated deck keeps everyone contained in a defined outdoor area.
Finally, a deck adds resale appeal for those who own the land or lease a long-term site. Buyers or renters see it as a value-add, particularly if the structure is well-maintained and built with weather-resistant materials. Note that decks attached to campers on leased land may require written permission from the property owner, and removal at the end of the lease term is often mandatory.
Planning Your Camper Deck: Size, Materials, and Budget
Start by measuring the camper’s entry door height and the width of the area where the deck will sit. A standard camper door is roughly 24 to 30 inches off the ground, so plan for a deck height that lands just below the threshold. Most DIYers aim for a deck surface 2 to 4 inches lower than the door to prevent water from pooling at the entry.
For materials, pressure-treated lumber is the workhorse choice for framing. Standard dimensions are 2×6 or 2×8 joists on 16-inch centers, with 5/4×6 or 2×6 decking boards. Composite decking is lighter and requires less maintenance, but costs roughly double per linear foot and may not be worth it for portable setups that get disassembled seasonally. Cedar and redwood offer natural rot resistance and a cleaner look, but they’re pricier and can splinter without regular sealing.
Budget will vary widely. A simple 8×10-foot portable deck using pressure-treated framing and standard deck boards runs $300 to $600 in materials, depending on regional lumber prices. Adding railings, steps, or composite decking can push costs to $1,000 or more. Always add 10% to material estimates to cover waste, mistakes, and hardware.
Permit considerations: Freestanding decks under 200 square feet and less than 30 inches high typically don’t require permits in most jurisdictions, but rules vary. Check with the local building department if the deck will be semi-permanent or attached to a structure. For decks on leased campground sites, confirm that construction is allowed and whether the deck must be removable.
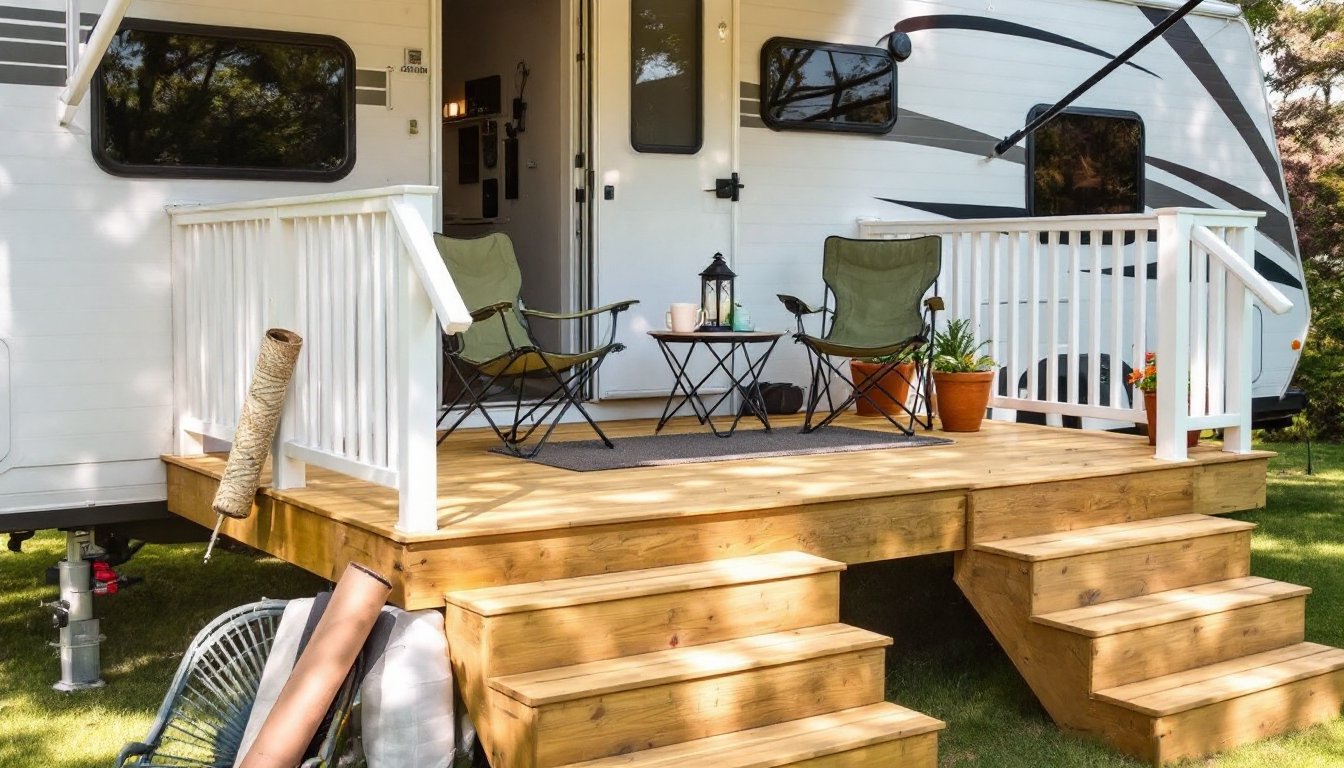
Portable and Freestanding Deck Designs
Portable decks are ideal for campers that move several times per season. The frame is built in sections, usually 4×8 or 4×10-foot panels, that can be disassembled, stacked, and transported in a truck bed or trailer. Each panel consists of a perimeter frame of 2×6 lumber with joists running perpendicular on 16-inch centers. Decking boards are screwed down, and panels connect with carriage bolts or heavy-duty cam locks.
For a truly lightweight setup, consider using aluminum framing instead of wood. Aluminum won’t rot, resists corrosion, and weighs roughly half as much as treated lumber. Pair it with composite or PVC decking for a completely weather-proof, low-maintenance build. Builders seeking woodworking project plans often adapt modular deck designs to fit specific camper dimensions.
Leveling is critical. Use adjustable deck blocks or concrete piers at each corner and midpoint along joists. These allow for fine-tuning on uneven ground and prevent the frame from sinking into soft soil. Avoid stacking cinder blocks without mortar, they shift over time and create safety hazards.
A freestanding deck doesn’t attach to the camper itself, which is important for weight distribution and structural integrity. Instead, the deck butts up to the entry door with a 1-inch gap to allow for camper movement and thermal expansion. Add a removable threshold ramp if needed to bridge the gap.
Built-In Deck Additions for Permanent Setups
For campers parked year-round or on owned property, a more robust built-in deck makes sense. This type of deck sits on a permanent foundation, either poured concrete footings or helical piers driven into the ground. Footings should extend below the frost line (depth varies by region, but commonly 36 to 48 inches in cold climates) to prevent heaving and settling.
Frame the deck with 2×8 or 2×10 joists spanning no more than 8 feet between supports. Attach a ledger board to the camper’s frame only if the camper manufacturer confirms the sidewall can support the load, many RVs have thin aluminum or fiberglass siding that won’t hold structural fasteners. If in doubt, build the deck freestanding and position it tight to the camper.
Railings are required by the International Residential Code (IRC) if the deck surface is more than 30 inches above grade. Use 4×4 posts at corners and every 6 feet along the perimeter, with 2×4 top and bottom rails and balusters spaced no more than 4 inches apart to prevent small children from slipping through.
Steps should have a uniform rise and run, typically a 7-inch rise and 11-inch run, with at least one handrail if there are more than two risers. Builders working on step-by-step DIY project tutorials will find detailed stair calculators and cutting guides to ensure code compliance.
Consider adding a roof or pergola over part of the deck for shade and rain protection. Attach posts to the deck frame using galvanized post bases and lag screws, and ensure the structure is braced diagonally to resist wind loads. Check local codes for snow load requirements if building in areas with heavy winter weather.
Multi-Level and Expandable Deck Ideas
Multi-level decks work well on sloped sites or when the camper sits higher off the ground. The upper level aligns with the entry door, while a lower level extends outward at ground level, creating distinct zones for cooking, dining, and lounging. Frame each level independently, connecting them with a short staircase. Use the same joist spacing and material throughout to maintain consistent strength and appearance.
Expandable decks use a hinged or sliding section that folds out when the camper is parked and collapses for transport. Build the main deck as a fixed platform, then add a secondary frame on heavy-duty barn door hinges or drawer slides rated for outdoor use. Reinforce the hinge side with blocking between joists, and use locking pins or latches to secure the expanded section in place. This design is popular with seasonal campers who want maximum space without a full teardown.
Another option is a wraparound deck that extends along two or more sides of the camper. This requires careful planning to avoid blocking windows, utility hookups, or slide-outs. Frame each side separately, then tie them together at the corners with blocking or metal joist hangers. For slide-outs, leave a 6 to 8-inch gap in the decking and install removable panels or a hinged gate that swings out of the way.
DIYers referencing tool reviews will find that a compound miter saw is invaluable for cutting stair stringers and angled corners on multi-level builds. A circular saw works, but the miter saw delivers cleaner, repeatable cuts on complex angles.
Decorating and Furnishing Your Camper Deck
Once the structure is sound, focus on making the deck functional and comfortable. Start with outdoor rugs to define seating areas and add color. Choose polypropylene or polyester rugs that resist mold and can be hosed off. Avoid natural fiber rugs, they rot quickly in damp conditions.
Seating can be built-in or freestanding. For built-in benches, frame them into the deck perimeter using the same 2×6 lumber as the decking. Add hinged seat tops for hidden storage underneath, ideal for stowing cushions, tools, or propane tanks. Freestanding furniture should be lightweight and weather-resistant: aluminum or resin wicker holds up better than wood or fabric.
Lighting extends usability into the evening. Solar post cap lights install easily on railing posts without wiring. For brighter task lighting, run low-voltage LED strips along the deck perimeter or under railings. Use outdoor-rated cable and connectors, and protect all connections with waterproof junction boxes.
Shade options include retractable awnings, pergolas, or shade sails. Retractable awnings mount to the camper sidewall and roll out over the deck: ensure the camper frame can support the mounting brackets. Pergolas add vertical interest and can support climbing plants or string lights. Shade sails are the budget option, stretch UV-resistant fabric between posts or trees using stainless steel turnbuckles for tension adjustment.
Finally, add planters, hooks for hanging lanterns, and a small side table for drinks or a camp stove. Keep furnishings minimal if the deck is portable, everything should pack flat or nest together for transport.
Conclusion
A well-planned camper deck extends living space, improves site functionality, and makes outdoor time more enjoyable. Whether building a lightweight portable frame or a permanent multi-level structure, the key is matching the design to how the camper gets used and ensuring the build is level, stable, and code-compliant. With the right materials and a solid plan, a camper deck becomes one of the most practical upgrades a DIYer can tackle.