Table of Contents
ToggleBlack and white shower tile delivers serious impact without the risk of dated color choices. This high-contrast palette works in nearly any bathroom size, complements existing fixtures, and adapts to both vintage and contemporary styles. Whether planning a full remodel or updating a tired shower surround, these design strategies cover pattern options, layout techniques, and practical installation considerations. From classic subway arrangements to bold geometric statements, the right combination of monochrome tiles can elevate a basic wet room into a standout feature.
Key Takeaways
- Black and white shower tile creates timeless design appeal that adapts to any bathroom style and won’t feel dated during future resale.
- Standard ceramic and porcelain black and white tiles cost just $2–$8 per square foot, making them a budget-friendly option compared to specialty colors.
- Checkerboard and subway tile patterns offer proven layouts—use 4×6-inch square tiles for checkerboard to avoid overwhelming small spaces, and pair with black grout for modern contrast.
- Hexagon tiles deliver geometric impact without custom cuts when ordered on mesh sheets, though they require a wet tile saw and 15–20% extra material for mistakes.
- Marble-look porcelain in black and white schemes provides elegant stone aesthetics without the maintenance headaches of natural marble.
- For DIY first-timers, running bond subway tile with black grout provides professional results with the most forgiving installation curve compared to complex patterns like herringbone.
Why Black and White Tiles Never Go Out of Style
Monochrome tile schemes survive decades of design trends because they function as a neutral backdrop. Unlike colored tiles that lock a bathroom into a specific era, black and white combinations adapt as decor changes. This flexibility matters during resale, prospective buyers see a clean slate rather than someone else’s bold color preferences.
The practical advantages extend beyond aesthetics. Light-colored grout on white tile shows dirt and soap scum quickly, but pairing white surfaces with black grout lines actually camouflages grime longer between deep cleans. Conversely, dark tiles hide water spots that would stand out on lighter surfaces.
Standard ceramic and porcelain tiles in black and white typically cost $2–$8 per square foot for basic field tiles, making them budget-friendly compared to specialty colors or imported designs. Higher-end options like large-format porcelain slabs or hand-glazed ceramics run $10–$25 per square foot. Material availability also runs deep, most tile suppliers stock dozens of black and white profiles year-round, so matching or replacing damaged pieces years later stays manageable.
From a design perspective, the stark contrast between black and white creates visual definition in small shower enclosures. Strategic placement of dark tiles can make walls recede or draw attention to architectural features like niches or built-in benches.
Classic Checkerboard Patterns for a Retro Vibe
Checkerboard layouts deliver instant period character, particularly for bathrooms with vintage fixtures or Art Deco details. This pattern works best with square tiles in 4×4-inch or 6×6-inch formats. Smaller tiles (2×2-inch mosaics) create a busy look that can overwhelm shower walls, while anything larger than 6×6 loses the checkerboard effect in tight spaces.
Installation considerations:
- Start layout from the center of the most visible wall to ensure balanced borders. Ending with thin slivers along edges looks sloppy.
- Use rectified tiles (machine-cut edges) for tighter grout lines and cleaner pattern definition. Standard tiles with cushion edges create wider, less precise grout joints.
- Plan for waterproofing membrane installation before tile work. Shower walls require either a bonded membrane like Kerdi or a topical sealant over cement board per IRC requirements for wet areas.
For a twist on the traditional grid, rotate the checkerboard 45 degrees to create a diamond pattern. This orientation requires more cuts along perimeters but adds visual movement. Expect material waste to increase by 10–15% compared to straight-set layouts due to diagonal cuts.
Pair checkerboard walls with solid white or black flooring to avoid pattern overload. Penny tile in coordinating colors works for shower floors where smaller pieces provide better slip resistance through increased grout line density.
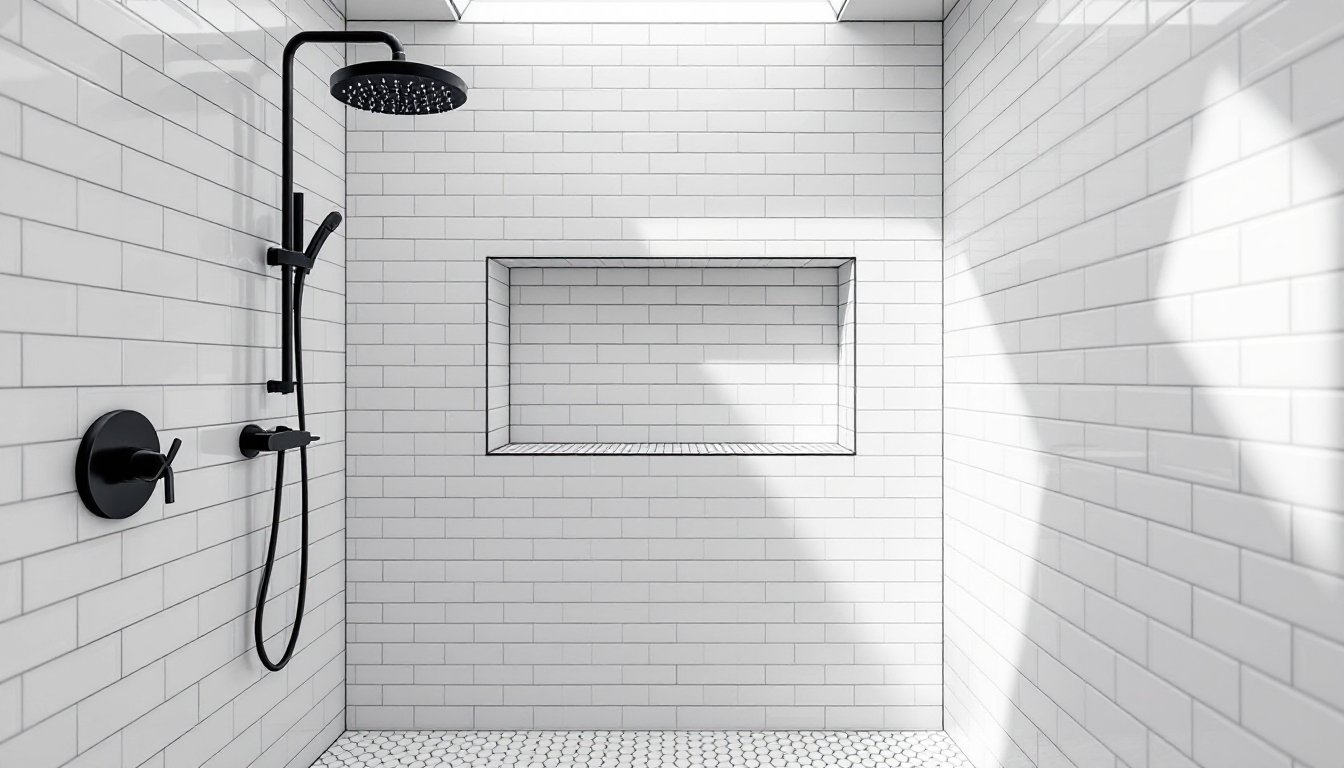
Modern Subway Tile Layouts with Black Grout
Standard 3×6-inch subway tile remains the workhorse of shower installations for good reason, rectangular formats hide minor wall irregularities better than large-format tiles, and the running bond pattern (offset by half a tile length) distributes stress across grout lines during seasonal movement.
Black grout transforms basic white subway tile from contractor-grade to design-forward. Unsanded grout works for grout lines 1/8-inch or narrower, while sanded grout handles joints up to 3/8-inch. For shower environments, always add a penetrating grout sealer after full cure (typically 72 hours). Black grout hides mildew better than white, but sealing remains essential to prevent water penetration behind tiles.
Layout variations to consider:
- Vertical stack: Tiles aligned in straight columns rather than staggered. Creates a modern, grid-like appearance but requires perfectly plumb walls, any deviation becomes obvious.
- Herringbone: Tiles meet at 90-degree angles in a zigzag pattern. Increases labor and material costs by roughly 20% but delivers high visual interest.
- 1/3 offset: Instead of the typical 50% offset, shift each row by one-third the tile length. Subtle but distinct from standard running bond.
Many home design resources like Remodelista showcase creative subway tile arrangements that break from traditional patterns. For DIYers without tile experience, stick with running bond for the first attempt. The forgiving offset hides small lippage (height differences between adjacent tiles) better than stack or herringbone layouts.
Geometric and Hexagon Tile Designs
Hexagon tiles deliver geometric punch without requiring custom cuts for the pattern itself. Standard 2-inch hex mosaics come on 12×12-inch mesh sheets for faster installation, while larger 5-inch or 8-inch individual hexagons make bold statements with fewer grout lines.
Pattern options:
- Solid field with accent strip: Run white hexagons across the majority of walls, then insert a horizontal band of black hexes at eye level or as a border.
- Gradient transition: Start with solid black at the base, gradually mix in white tiles, then finish with solid white near the ceiling. This approach requires careful planning, sketch the gradient on graph paper before ordering materials.
- Scattered placement: Randomly place black hexagons within a white field (or vice versa) for an organic, terrazzo-like effect. Aim for roughly 15–25% coverage with the accent color to maintain visual balance.
Hexagon tiles present cutting challenges around shower valves, corners, and ceiling transitions. A wet tile saw with a fresh diamond blade is essential, no scoring and snapping. If tackling this as a first tile project, expect slower progress and order 15–20% extra for practice cuts and mistakes.
Triangle tiles offer another geometric option, though installation complexity jumps significantly. The multiple points make lippage control difficult, and the angular cuts around fixtures demand precision. Better suited for experienced tilers or accent areas rather than full shower enclosures.
Bold Accent Walls with Black Tiles
A single black tile wall creates dramatic focal points without darkening the entire shower. The most effective placement puts black tile on the back wall (opposite the showerhead) where it’s immediately visible when entering the bathroom. This approach maintains brightness with white on the three remaining walls while delivering high contrast where it counts.
Tile format selection matters:
- Large-format porcelain slabs (24×48-inch or larger) minimize grout lines for a sleek, modern look. Require two people for installation and perfect substrate prep, any deviation in the wall plane shows up as lippage.
- Stacked subway tile in matte black creates texture through shadows in the grout lines, even with minimal dimensional variation.
- 3D geometric tiles with raised patterns catch light differently throughout the day. These specialty products run $15–$30 per square foot and add significant visual interest.
Black tile amplifies any water spots or soap residue, so consider texture. Matte or textured finishes hide water marks better than glossy surfaces. But, heavily textured tiles accumulate soap scum in crevices, there’s a balance between hiding spots and creating cleaning challenges.
For shower niches in accent walls, carry the black tile inside the recess or switch to white for contrast. Wrapping black tile into the niche creates a cohesive, high-end look but requires careful waterproofing at all inside corners. Use waterproof foam niches rather than site-built versions for better long-term performance.
Marble-Look Tiles for Elegant Contrast
Natural marble requires significant maintenance in shower applications, regular sealing, susceptibility to etching from acidic cleaners, and potential staining from hard water. Marble-look porcelain tile delivers the aesthetic without the upkeep. Modern printing technology creates convincing veining patterns, and porcelain’s density (less than 0.5% water absorption) makes it ideal for wet areas.
For black and white schemes, look for Carrara-style porcelain with gray veining on white backgrounds or Nero Marquina-look tiles featuring white veining on black. These patterns work in several configurations:
- Book-matched panels: Pair tiles so veining creates mirror-image symmetry, similar to high-end stone installations.
- Mixed black and white marble-look: Alternate panels or create feature strips. Keep veining orientation consistent for a purposeful rather than random appearance.
- Large-format slabs: 24×48-inch or 36×36-inch tiles reduce grout lines, emphasizing the stone-like appearance. Expect to pay premium prices ($12–$20 per square foot) for convincing marble-look porcelain in larger formats.
Inspiration galleries like House Beautiful regularly feature marble-look installations, though many showcase actual stone that demands different care than porcelain alternatives. Installation follows standard porcelain methods, thinset mortar over properly waterproofed substrate, with grout joints sealed after curing. Unlike real marble, porcelain won’t etch from standard bathroom cleaners, making long-term maintenance straightforward.
Conclusion
Black and white tile combinations offer proven durability, design flexibility, and broad appeal for shower renovations. Success depends on careful pattern selection matched to space constraints, proper waterproofing beneath all tile work, and realistic assessment of installation skill level. Complex patterns like herringbone or gradient hexagons deliver stunning results but demand extra time and material. For DIYers tackling their first tile project, straightforward layouts like running bond subway tile with black grout provide professional-looking results with a more forgiving learning curve.