Table of Contents
ToggleDeck skirting often gets overlooked in favor of railings and furniture, but it’s one of the most cost-effective upgrades a homeowner can tackle. The space beneath a deck becomes a catch-all for leaves, critters, and forgotten garden tools, and it’s rarely pretty. Adding skirting transforms that gap into a finished detail while solving practical problems. The good news? Budget-conscious DIYers have more options than ever in 2026, from salvaged materials to modern composites that mimic pricier looks. This guide walks through proven, wallet-friendly skirting solutions that deliver curb appeal without requiring a contractor or a four-figure budget.
Key Takeaways
- Deck skirting ideas for cheap budgets range from pressure-treated lattice ($20–$35 per panel) to salvaged pallets and corrugated metal, making this upgrade accessible for DIYers without contractor costs.
- Skirting solves functional problems including pest control, moisture ventilation around deck framing, and concealing storage while maintaining curb appeal.
- Vinyl lattice ($40–$60) and composite options last longer than wood but cost slightly more, while reclaimed wood brings rustic charm at near-zero material cost.
- Proper installation requires building a treated 2×4 frame, pre-finishing materials before mounting, and burying the bottom edge 4–6 inches below ground to deter animals and hide gaps.
- Access panels (minimum 24×24 inches) with hinges or removable sections are essential for reaching stored items, utilities, and crawl spaces beneath the deck.
Why Deck Skirting Matters (Beyond Just Looks)
Deck skirting isn’t just about aesthetics, it’s a functional upgrade that solves multiple problems at once. Pest control tops the list. Raccoons, skunks, and feral cats love the dark, protected space under a deck. Skirting acts as a barrier, especially when installed with hardware cloth buried 6–8 inches below grade to prevent digging.
Skirting also improves airflow around deck framing. Proper ventilation helps moisture escape, reducing the risk of rot in joists and beams. Most building codes don’t mandate skirting, but the International Residential Code (IRC) does require adequate ventilation for enclosed spaces under decks. A lattice or slotted design satisfies this requirement without trapping humidity.
Finally, skirting hides storage and utilities. Homeowners often tuck hoses, pool chemicals, or outdoor equipment under the deck. Skirting keeps that clutter out of sight while still allowing access through removable panels or gates. It’s a cleaner look than tarps or makeshift screens, and it adds to perceived home value during resale.
One practical note: if the deck sits less than 12 inches off the ground, skirting may trap moisture against the soil. In that case, consider a partial install on the most visible sides, leaving the back open for drainage.
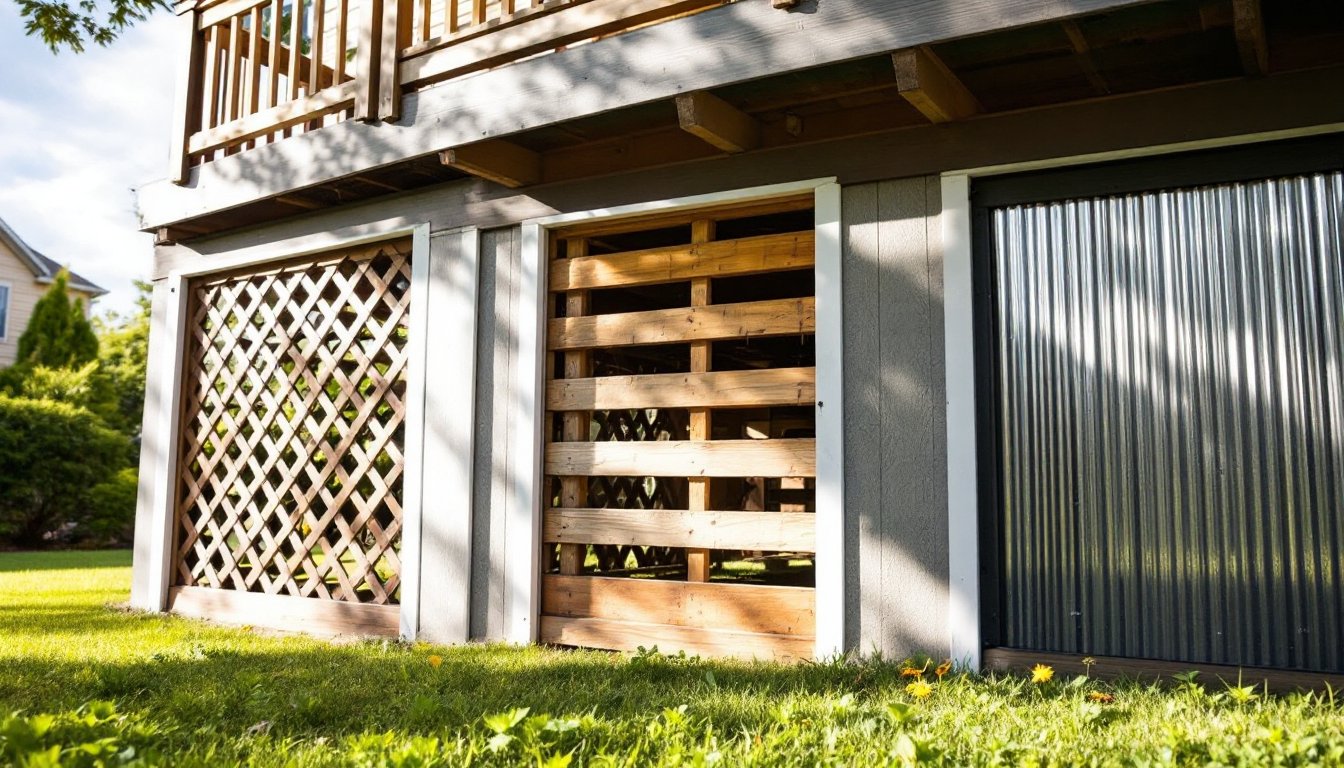
Lattice Panels: The Classic Affordable Choice
Pressure-treated wood lattice remains the go-to for budget deck skirting. 4×8-foot panels run $20–$35 at most home centers, and installation is straightforward. The diagonal or square grid pattern allows airflow while blocking views of the underside. Standard lattice comes in 3/8-inch or 1/2-inch thickness: the thicker version holds up better to lawn equipment bumps and pet paws.
Installation involves building a simple 2×4 frame around the deck perimeter, secured to the deck posts or rim joist with galvanized lag screws. Lattice panels slip into channels routed into the framing or are face-mounted with trim strips. A single DIYer can complete a 12×16-foot deck in a weekend.
Vinyl lattice costs slightly more, $40–$60 per panel, but eliminates the need for annual staining or painting. It won’t rot or warp, making it a smart choice in damp climates or near lawn sprinklers. The trade-off is rigidity: vinyl lattice can crack in freezing temperatures if impacted.
For a polished finish, add a 1×4 or 1×6 trim board around the top and bottom edges. This hides cut edges and gives the skirting a framed look. Use exterior-grade screws, not nails, they’re easier to remove if a panel needs replacing or if access is required for plumbing or electrical work beneath the deck.
One downside: lattice is see-through. If concealing stored items is a priority, consider backing the panels with landscaping fabric or painting the interior side a dark color to reduce visibility.
Reclaimed Wood and Pallet Skirting for Rustic Charm
Salvaged materials bring character and keep costs near zero. Shipping pallets are the most accessible source, many retailers and warehouses give them away for free. Disassemble the pallets with a reciprocating saw or pry bar, pulling boards off carefully to minimize splits. Expect about 60–70% usable material per pallet after discarding damaged or heavily stained pieces.
Before installation, inspect for HT (heat-treated) stamps, which indicate the wood is safe for reuse. Avoid pallets marked MB (methyl bromide), a toxic fumigant banned in many countries but still present on older stock. Wire-brush or sand the boards to remove splinters and dirt, then decide whether to stain or leave them weathered. A clear sealant extends lifespan without covering the aged patina.
Install pallet boards vertically or horizontally, spacing them 1/4 to 1/2 inch apart for ventilation. Horizontal runs create a modern, board-and-batten look, while vertical slats feel more traditional. Fasten boards to a 2×4 frame with 1-5/8-inch deck screws (exterior-rated, coated to resist rust).
Another option: barn wood or fence pickets from demolition projects. Check local classifieds, habitat for humanity ReStores, or community salvage yards. Weathered cedar or redwood adds warmth and naturally resists rot. Even mismatched widths work, the variation adds to the rustic aesthetic. Many budget renovation stories showcase similar reclaimed-material builds that age beautifully with minimal upkeep.
Safety note: always wear leather gloves and safety glasses when handling rough lumber. Splinters from weathered wood can carry bacteria, and rusty nails are a tetanus risk.
Vinyl and Composite Options That Won’t Break the Bank
Vinyl skirting systems designed specifically for decks offer a middle ground between wood and premium composites. Brands like Veranda and Fiberon produce tongue-and-groove vinyl planks that snap together without visible fasteners. A 12-foot section runs $25–$50, depending on profile and color. Installation is faster than wood, no painting, no pre-drilling, and most systems include matching corner and top-rail trim.
These systems resist UV fading, mold, and insect damage. They’re ideal for homeowners who want a finished look with minimal annual maintenance. The drawback is limited color selection, mostly white, tan, and gray, and they can look plasticky up close. But, textured finishes have improved significantly in recent years.
Composite lattice (made from wood fiber and recycled plastic) splits the difference. It costs more upfront than wood lattice, around $50–$75 per 4×8 panel, but lasts decades without rot or warping. Trex and TimberTech both manufacture composite lattice in colors that coordinate with their decking lines. If the deck itself is composite, matching skirting creates a cohesive look.
For the budget-conscious, check for factory seconds or discontinued colors at home improvement stores. These often sell at 30–50% off with only minor cosmetic flaws, scratches or slight color variation that won’t be noticeable once installed.
Installation mirrors wood lattice: build a 2×4 frame, secure the panels, and trim the edges. Composite materials are heavier than vinyl, so use #8 or #10 screws rather than brad nails. Pre-drill screw holes to avoid cracking the panel edges.
Creative DIY Alternatives: From Corrugated Metal to Fabric Screens
Corrugated metal panels deliver an industrial-modern look for $15–$30 per 3×8-foot sheet. Galvanized steel or aluminum won’t rust, and the ribbed texture adds visual interest. Cut panels to height with tin snips or a circular saw fitted with a metal-cutting blade (wear hearing protection and a face shield, metal throws sharp chips). Frame with treated 2×4s and secure panels with self-tapping screws and rubber washers to prevent leaks. This approach works especially well on contemporary homes or in farmhouse-style landscapes.
For a softer, temporary solution, outdoor fabric screens attach to a cable or PVC frame. Heavy-duty mesh fabric (like Sunbrella or coated polyester) blocks 70–90% of light while allowing airflow. Stretch the fabric across a PVC pipe frame, 1-inch schedule 40 pipe and corner fittings run about $20 for a 12-foot section, and secure with UV-resistant zip ties or grommets and bungee cords. This option suits renters or anyone testing a skirting style before committing to a permanent install. Fabric screens are also removable for winter storage or pressure washing.
Bamboo fencing brings a tropical or Zen aesthetic. Roll-out bamboo panels (4 feet tall, 8 feet wide) cost $25–$40 and install quickly, just staple or screw them to a wooden frame. Bamboo weathers to a silver-gray unless sealed annually with a water-repellent stain. It’s less durable than vinyl but easy to replace in sections. Some DIY decor projects pair bamboo skirting with matching planter boxes for a cohesive outdoor room.
Cinder block screens with planted gaps offer a modern, architectural look. Stack blocks (about $1.50 each) dry-laid or mortared, leaving openings for succulents or trailing vines. This works best for low decks (under 24 inches) where the block height won’t overwhelm the space. Check local codes, some jurisdictions consider stacked masonry a retaining wall and require footings if it exceeds a certain height.
Installation Tips to Save Money and Time
Start by measuring twice, cutting once, a cliché, but critical when working with panels. Measure the perimeter of the deck at ground level, accounting for posts, stairs, and gate openings. Sketch a quick plan showing panel placement and note where you’ll need access doors for storage or utilities.
Build the frame first using pressure-treated 2×4 lumber. Secure horizontal rails to the deck posts with 3-inch lag screws or structural screws. Most decks need a top and bottom rail: for skirting over 24 inches tall, add a mid-rail for stability. Use a level to ensure rails are plumb, even a slight tilt becomes obvious once panels are installed.
Pre-finish materials before installation whenever possible. Staining or painting lattice or wood boards flat on sawhorses is faster and more thorough than trying to coat them once they’re vertical. Apply two coats of exterior stain or paint, letting each dry fully.
For access panels, plan a 24×24-inch minimum opening, large enough to reach stored items or service a crawl space sump pump. Hinge one or two panels with exterior-grade strap hinges, or build a removable section secured with turn buttons or barrel bolts. Mark access points clearly so future homeowners (or a forgetful future-you) know where to enter.
Dig a shallow trench (2–3 inches deep) along the bottom edge of the skirting and bury the lower 4–6 inches of lattice or board. Backfill with soil or mulch. This hides the gap where the deck meets the ground and deters animals from digging underneath. If using hardware cloth for pest control, overlap it with the skirting by at least 6 inches and secure with galvanized staples.
Finally, budget for trim. A simple 1×3 or 1×4 cap along the top edge costs about $1–$2 per linear foot but dramatically improves the finished look. Paint or stain the trim to match the deck posts or railings for a unified design. Many painting tutorials suggest using a foam brush for trim work, it’s faster than a bristle brush and leaves fewer streaks.
Conclusion
Deck skirting doesn’t have to drain savings or demand advanced carpentry skills. Lattice, reclaimed wood, vinyl, and even corrugated metal each offer a distinct look at a DIY-friendly price point. The key is matching material choice to climate, maintenance tolerance, and the deck’s overall style. With a weekend, basic tools, and a willingness to measure carefully, homeowners can close off that under-deck void and add a polished finishing touch that lasts for years.